
ChatGPTのAPIで何ができるの?

AIボットが作れそうですね。
自社製品を学習させたり、QAに答えるボットとか。
まずは、最もシンプルな形でAPIを利用してみましょう。
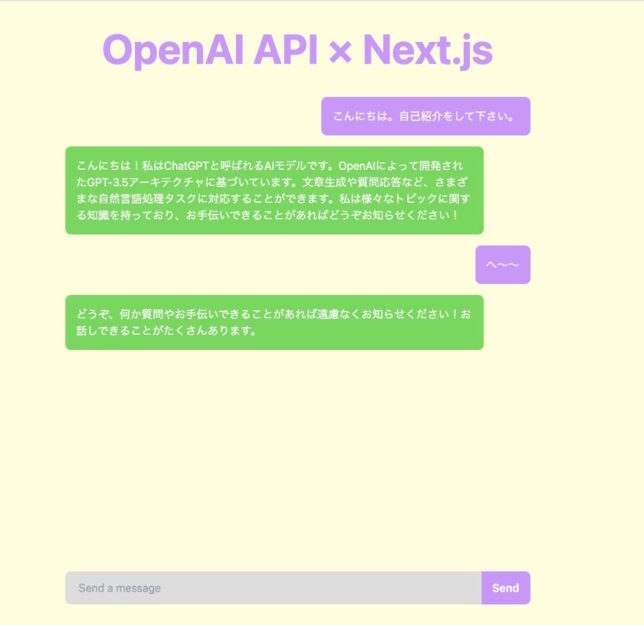
完成形のイメージ
公開している環境ではAPI接続していないので、ChatGPTからの返答はありませんが、こんな感じのWebアプリを作成していきます。

OpenAIのAPIキーを発行
とりあえずAPIキーを発行します。
APIキー発行後は二度と確認できないので、メモを忘れずに。
でも忘れたら削除して、再発行すれば大丈夫です。
上のリンクから、View API keys → Create new secret key
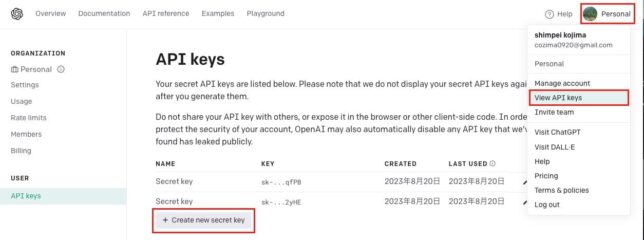
Create secret keyで作成。名前はなしでも大丈夫です。

簡易にAPI接続して確認してみる
APIキーが発行できたので簡易に接続してみます。
ターミナルから下記のコマンドを貼り付けて下さい。
curl https://api.openai.com/v1/chat/completions \
-H "Content-Type: application/json" \
-H "Authorization: Bearer sk-******APIキー******" \
-d '{
  "model": "gpt-3.5-turbo",
  "messages": [{"role": "user", "content": "Say this is a test!"}],
  "temperature": 0.7
}'
以前は無料枠で18ドルまで無料でしたが、2023年6月に価格が変更になり5ドル。2023年8月現在、無料枠はなくなったようです。
APIを試すのにクレジットカード登録して利用するしかありません。
とはいえ、低価格ですし月額の上限を設定できるので安心です。
API無料枠はなくなりましたが、Usage limitsで利用額上限を設定できるので安心です。
有料になることで利用しない人が増えるのは個人的にはありがたいです。。
Hard limit:1ヶ月あたりの上限額
Soft limit:この金額を超えるとメールが届く。だけ。
Next.jsでプロジェクト作成
環境構築
デスクトップなどに作業用のフォルダを作成して、VSCodeで開きます。⌘+jでエディタの下部にターミナルが表示されますので、ここにコマンドを入力していきます。
公式の手順に沿ってやっていきます。
npx create-next-app@latest
プロジェクト名はopenai-apiで作成します。
What is your project named? openai-api
✔ Would you like to use TypeScript? … No / Yes
✔ Would you like to use ESLint? … No / Yes
✔ Would you like to use Tailwind CSS? … No / Yes
✔ Would you like to use `src/` directory? … No / Yes
✔ Would you like to use App Router? (recommended) … No / Yes
✔ Would you like to customize the default import alias? … No / Yes


ライブラリのインストール
axios
$ npm install axios --save
scss
$ npm install sass --save-dev
.css 拡張子で作成していたファイルを、.scss に変更
- 置換前:
styles/global**.css** - 置換後:
styles/global**.scss** .cssファイルをインポートしている部分を、.scssに置換
.envファイル作成
ルートディレクトリに.envファイルを作成してAPIキーを変数に入れます。
OPENAI_API_KEY=sk-*************
chat.jsファイル作成(hello.jsを書き換え)
hello.jsを書き換えてchat.jsにします。
pages
└api
 └chat.js
chat.jsファイルの中身
import axios from 'axios';

export default async function handler(req, res) {
  const referer = req.headers.referer || req.headers.referrer;

  if (req.method !== 'POST') {
    res.status(405).json({ message: 'Method should be POST' });
  } else if (process.env.NODE_ENV !== "development") {
    if (!referer || referer !== process.env.APP_URL) {
      res.status(401).json({ message: 'Unauthorized' });
    }
  }
  else {
    try {
      const { body } = req;
      const url = 'https://api.openai.com/v1/chat/completions';
      const headers = {
        'Content-type': 'application/json',
        'Authorization': `Bearer ${process.env.OPENAI_API_KEY}`
      };

      const response = await axios.post(url, body, { headers: headers })

      res.status(200).json(response.data);
    } catch (error) {
      console.log(error);
      res.status(500).json({ message: "Something went wrong" });
    }
  }
}
ページ作成
index.jsを下記にします。
import { useState } from "react";
import axios from 'axios';
import LoadingAnimation from "./components/LoadingAnimation";

export default function Home() {
  const [inputValue, setInputValue] = useState('');
  const [chatLog, setChatLog] = useState([]);
  const [isLoading, setIsLoading] = useState(false);

  const handleSubmit = (event) => {
    event.preventDefault();
    setChatLog((prevChatLog) => [...prevChatLog, { type: 'user', message: inputValue }])
    sendMessage(inputValue);
    setInputValue('');
  }

  const sendMessage = (message) => {
    const url = '/api/chat';

    const data = {
      model: "gpt-3.5-turbo-0301",
      messages: [{ "role": "user", "content": message }]
    };
    setIsLoading(true);
    axios.post(url, data).then((response) => {
      console.log(response);
      setChatLog((prevChatLog) => [...prevChatLog, { type: 'bot', message: response.data.choices[0].message.content }])
      setIsLoading(false);
    }).catch((error) => {
      setIsLoading(false);
      console.log(error);
    })
  }

  return (
    <div className="container mx-auto max-w-[700px] px-3">
      <div className="flex flex-col justify-between min-h-screen h-[100%]">
        <div>
          <h1 className="text-[#d392fe] text-center font-bold sm:text-6xl text-4xl py-10">OpenAI API × Next.js</h1>

          <div className="flex flex-col space-y-4">
            {chatLog.map((message, index) => (
              message.message && (
                <div key={index} className={`flex ${message.type === 'user' ? 'justify-end' : 'justify-start'}`}>
                  <div className={`${message.type === 'user' ? 'bg-[#d392fe]' : 'bg-[#ddd]'} rounded-lg sm:p-4 p-2 text-white max-w-[90%]`}>
                    {message.message}
                  </div>
                </div>
              )
            ))}
            {isLoading && (
              <div key="chatLog.length" className="flex justify-start">
                <div className="bg-[#fff] border border-[#ddd] rounded-lg p-4 text-white">
                  <LoadingAnimation />
                </div>
              </div>
            )}
          </div>
        </div>
        <form onSubmit={handleSubmit} className="flex-none py-10">
          <div className="flex rounded-lg bg-[#ddd]">
            <input type="text" className="flex-grow px-5 py-3 bg-transparent text-[#333] focus:outline-none" placeholder="Send a message" value={inputValue} onChange={(e) => setInputValue(e.target.value)} />
            <button type="submit" className=" bg-[#d392fe] rounded-r-lg px-4 py-2 text-white font-semibold focus:outline-none hover:bg-purple-600 transition-colors duration-300">Send</button>
          </div>
        </form>
      </div>
    </div>
  )
}
下記の階層にcomponentsフォルダと、LoadingAnimation.jsxを作成します。
ローディング時のコンポーネントを作成します
ChatGPTが考え中の時に表示するやつです。
openai-api
└pages
   └components
      └LoadingAnimation.jsx
LoadingAnimation.jsxの中身
const LoadingAnimation = () => {
  return (
    <div className="flex items-center space-x-2 animate-pulse">
      <div className="w-3 h-3 rounded-full bg-gradient-to-r from-[#d392fe] to-[#50db4a] animate-spin"></div>
      <div className="w-3 h-3 rounded-full bg-gradient-to-r from-[#d392fe] to-[#50db4a] animate-spin"></div>
      <div className="w-3 h-3 rounded-full bg-gradient-to-r from-[#d392fe] to-[#50db4a] animate-spin"></div>
    </div>
  );
};

export default LoadingAnimation;
Tailwindのアニメーションのクラスは手軽に実装できるのでありがたいですね。
アニメーションに関しては下記の2つのクラスだけです。
animate-pulse:白く点滅
animate-spin:くるくる回る
globals.scssファイル
スタイルシートを下記にします。
@tailwind base;
@tailwind components;
@tailwind utilities;

$primary: #d392fe;
$secondary: #50db4a;
$bg: #feffdb;

body {
  font-size: 16px;
  background: $bg;
  @media only screen and (max-width: 768px) {
    font-size: 14px;
  }
}
以上です。
最後に
今回はOpneAIのAPIを使って簡単なアプリをNext.jsで作成してみました。
これから発展させてプロンプトデザインや、画像生成、音声入力などにチャレンジしたいなーと思っています。
いいのがあればまた共有します。
今回も最後までありがとうございました。
参考書籍↓↓