
Next.js、Notionを使ってブログを構築して行きたいと思います。
上から順番にやっていけば30分程度で手軽に構築できます。
興味はあるけど自分で開発するのが億劫だった方、どうぞ。
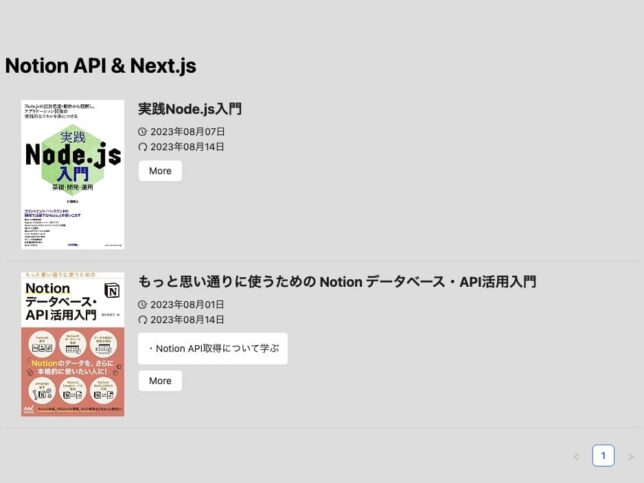
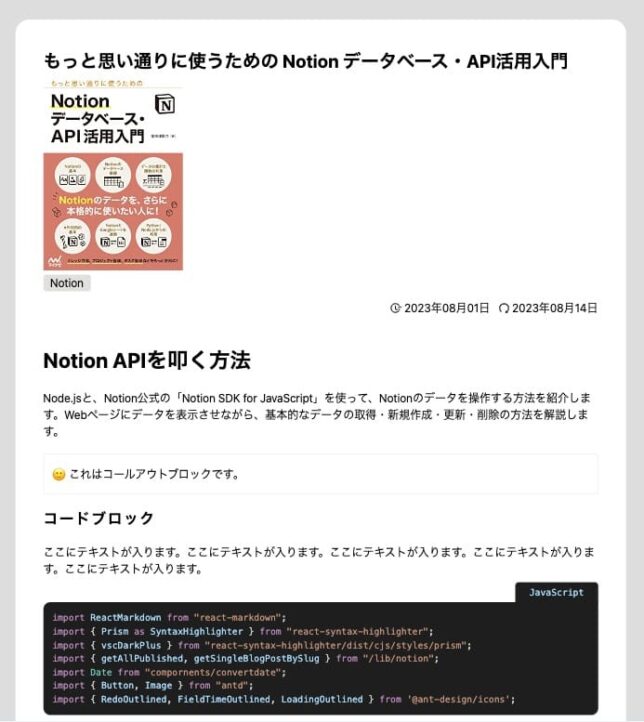
完成形のイメージ
見た目はこんな感じです。
限りなくシンプルにしました。
記事一覧ページ
記事詳細ページ
Notion側のセッティング
コードを書く前に、Notionでデータベースやインテグレーションを作成していきます。
面倒ですが、こうゆうのは慣れですね。
データベース作成
記事を登録していくデータベースを作成します。
Next.jsでプロパティ名、種類を指定しますので、大文字小文字など間違いないように登録してください。
| プロパティ名 | 種類 | 説明 |
|---|---|---|
| Name | タイトル | 記事タイトル |
| Tags | マルチセレクト | タグを設定します |
| Published | チェックボックス | チェックしたものを公開します |
| Date | 作成日時 | – |
| Slug | テキスト | 記事のURLになります |
| Description | テキスト | 簡易的な説明文(記事一覧ページに表示します) |
| Thumb | ファイルamp;メディア | 記事のサムネイル画像 |
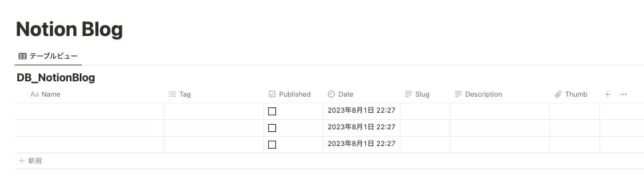
データベースが作成できたら、3記事ほど登録してくださいね。
インテグレーション作成
APIで記事を取得するために作成します。
- インテグレーションへのリンク(https://www.notion.so/my-integrations)
- 上記のリンクから「新しいインテグレーション作成」
- 名前は「NotionBlog」とかなんでもOKです。
- ロゴは登録したい方だけどうぞ
- シークレットキーをメモして下さい。こんなやつ→
secret_※※※※※※※※※※※※※※※※※※※※※
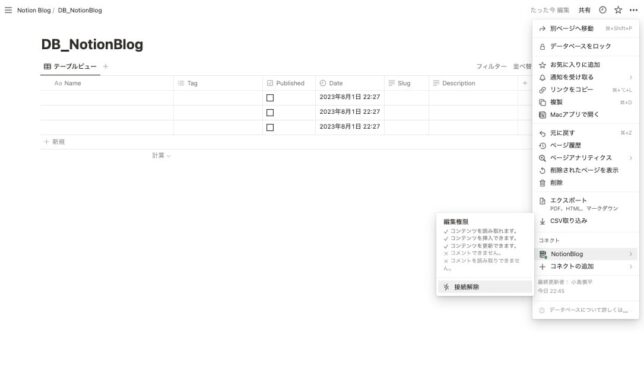
データベースとインテグレーションを接続します
先程作成したデータベースと、インテグレーションを接続します。
- データベース右上の「…」三点リーダクリック
- +コネクトの追加
- 作成したインテグレーション(NotionBlog)を選択
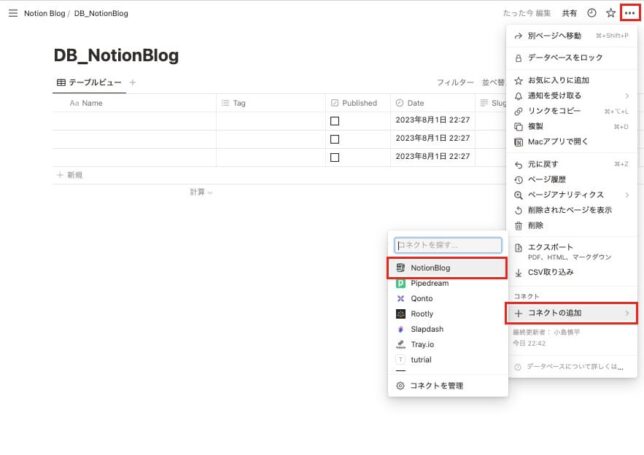
接続できたらこんな感じです。
データベース名と、シークレットキーを大切に保管します
大切に保管してください。特にシークレットキーは第三者に見られないように。
データベース名やシークレットトークンについてはこちらの記事を参照してください。


簡易にAPI接続して、データベース名とシークレットキーが正しいか確認する
ターミナルを開いて下記を入力してください。
接続できればデータが取得できます。
エラーなどなく、なにかしら取得できていればOKです。
curl 'https://api.notion.com/v1/databases/データベースID' \
-H 'Notion-Version: 2022-06-28' \
-H 'Authorization: Bearer '"シークレットキー"''
上手く取得できなかった方こちらどうぞ。もう少し詳しく解説しています。

Next.js環境構築
Next.jsのアプリを立ち上げていきます。
作業フォルダ作成
デスクトップなどにフォルダを作成してくだい。
フォルダ名は「notionblog」などなんでもOKです。
フォルダを作成したらVSCodeで開いて下さい。
Next.jsアプリ立ち上げ
VSCodeを開いたら⌘+jでVSCode内でターミナルを開いて、下記のコマンドを入力していきます。
notion-blogという名前で作成
npx create-next-app notion-blog
色々聞かれますが、下記の設定にしてください。
✔ Would you like to use TypeScript with this project? … No / Yes
✔ Would you like to use ESLint with this project? … No / Yes
✔ Would you like to use `src/` directory with this project? … No / Yes
✔ Would you like to use experimental `app/` directory with this project? … No / Yes
✔ What import alias would you like configured? … @/*cdでnotion-blogに移動します。
cd notion-blog
notion-blogのディレクトリに移動したら、npm run dev でローカルサーバーでNext.jsを立ち上げます。
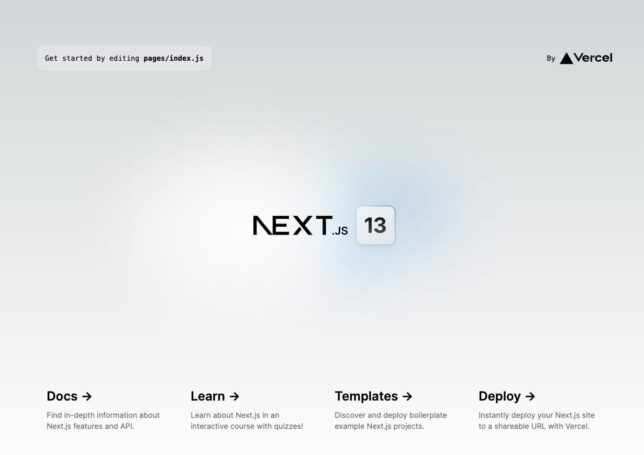
ローカルサーバーhttp://localhost:3000にアクセスします。
npm run dev

> notion-blog@0.1.0 dev
> next dev

- ready started server on 0.0.0.0:3000, url: http://localhost:3000
ローカルホスト3000にアクセスして、下記のページが表示されれば完了です。
見た目が違っても気にしなくてOKです。Next.jsのバージョンによって画面が変わります。

ローカルサーバーを終了させるコマンドはcontrol + cです。
次はライブラリなどをインストールしていきますが、ローカルサーバーが立ち上がったままだとインストールできないので、一度control+cで終了させて下さい。
いろいろインストールしていきます。
デザイン考えたり、CSS書くのが面倒なのでUIフレームワークのAnt DesignやTailwind-CSSを入れています。
また、日付変換用のDay.js、コードブロックをエディタのように表示してくれるreact-syntax-highlighterなどなど。
Ant Design
Ant Designのコンポーネントをメインに使っていきます。 styleの記述が不要なのはもちろんですが、ページャーやローディングアイコンなども手軽に実装できます。
npm install antd

Tailwind-css
メインはAnt Designを使用しますが、背景色や文字サイズ、余白やレイアウトなどTailwind-cssを使用します。
npm install -D tailwindcss postcss autoprefixer
npx tailwindcss init -ptailwind.config.jsに下記を追記
/** @type {import('tailwindcss').Config} */
module.exports = {
  content: [
    "./app/**/*.{js,ts,jsx,tsx}",
    "./pages/**/*.{js,ts,jsx,tsx}",
    "./components/**/*.{js,ts,jsx,tsx}",

    // Or if using `src` directory:
    "./src/**/*.{js,ts,jsx,tsx}",
  ],
  theme: {
    extend: {},
  },
  plugins: [],
}global.cssに下記を追記
@tailwind base;
@tailwind components;
@tailwind utilities;公式のインストール方法と同様です。
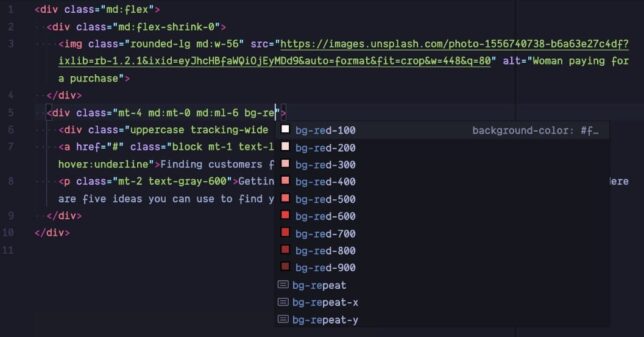
VSCodeの拡張機能もインストールしておくと便利
TailwindCSSのクラス名を予測して表示してくれます。
Scss
あまり使わないですが、cssを記述する際は効率よくScssで記述したいと思います。
npm install sass --save-dev .css を、.scss に変更すれば、SCSS フォーマットでスタイル記述できます。
- 置換前:
styles/global**.css** - 置換後:
styles/global**.scss**
.css ファイルをインポートしている部分を、.scss に置換。
import type { AppProps } from 'next/app'
import '../styles/global.scss'

export default function MyApp({ Component, pageProps }: AppProps) {
  return <Component {...pageProps} />
}
Day.js
2023-08-01T02:0:00.000Zのような日付を2023年8月1日に変換するコンポーネントを作成します。
npm i -S dayjsルートディレクトリにcomponentsフォルダを作成し、その中にconvertdate.jsというファイルを作成します。
notion-blog
└ components
	└ convertdate.js
components/convertdate.js
import dayjs from 'dayjs';

export default function Date({ convertDate }) {
  const publishedAt = dayjs(convertDate).format('YYYY年MM月DD日');
  return (
    <time dateTime={convertDate}>{publishedAt}</time>
  )
}
notion-sdk-js
API接続が簡単にできます。
npm install @notionhq/client
notion-to-md
Notionのブロックをマークダウンに変換してくれます。
バージョンを指定してインストールします。
npm install notion-to-md@2.6.0react-markdown
Notionのブロックをnotion-to-mdを使ってマークダウンに変換し、マークダウンをHTMに変換してブラウザでレンダリングするのに、React Markdownパッケージを使います。
npm install react-markdownreact-syntax-highlighter
コードブロックをいい感じに表示してくれます。
npm install react-syntax-highlighter --saveswr
npm install swraxios
npm install axiosインストールお疲れ様でした。
大変でしたが、ここからは楽になります。
スタイルの記述やページャーの実装、コードブロックの表示などに時間を使わなくて良くなります。
API接続|API接続してNotionから情報を取得します
.env.localファイルを作成します。
ルートディレクトリに.env.localファイルを作成します。
API接続時に使用する機密情報を変数にして格納します。
notion-blog
└ .env.local
メモしていたデータベース名と、シークレットキーを貼り付けます。
NOTION_TOKEN=secret_****
DATABASE_ID=****
.envファイルの機密情報は他人に見せたり、Gitにアップロードしない
notion.jsファイルを作成します
API接続して、データベースから情報を取得します。
ルートディレクトリにlibフォルダを作成し、そのなかにnotion.jsファイルを作成します。 フォルダ名やファイル名はなんでもOKです。libはLibraryの略です。
notion-blog
└ lib
	└ notion.js
公式のnotion-sdk-jsを使用しています。Publishedにチェックマークを入れたものだけ取得しています。
詳しい内容は下記を参照下さい。
lib/notion.js
const { Client } = require("@notionhq/client")
const notion = new Client({
  auth: process.env.NOTION_TOKEN,
})

export const getAllPublished = async () => {
  const posts = await notion.databases.query({
    database_id: process.env.DATABASE_ID,
    filter: {
      property: "Published",
      checkbox: {
        equals: true,
      },
    },
    sorts: [
      {
        property: "Date",
        direction: "descending",
      },
    ],
  });

  const allPosts = posts.results;
  return allPosts.map((post) => {
    return getPageMetaData(post);
  });
};

const getPageMetaData = (post) => {
  const getTags = (tags) => {
    const allTags = tags.map((tag) => {
      return tag.name;
    });
    return allTags;
  };

  return {
    id: post.id,
    last_edited_time: post.last_edited_time,
    title: post.properties.Name.title[0].plain_text,
    tags: getTags(post.properties.Tags.multi_select),
    description: post.properties.Description.rich_text[0]?.plain_text || false,
    date: post.properties.Date.created_time,
    slug: post.properties.Slug.rich_text[0].plain_text,
    thumbnail:
      post.properties.Thumb && post.properties.Thumb.files.length > 0
        ? post.properties.Thumb.files[0].file.url
        : null,
  };
}

const { NotionToMarkdown } = require("notion-to-md");
const n2m = new NotionToMarkdown({ notionClient: notion });

export const getSingleBlogPostBySlug = async (slug) => {
  const response = await notion.databases.query({
    database_id: process.env.DATABASE_ID,
    filter: {
      property: "Slug",
      formula: {
        string: {
          equals: slug,
        },
      },
    },
  });
  const page = response.results[0];
  const metadata = getPageMetaData(page);
  const mdblocks = await n2m.pageToMarkdown(page.id);
  const mdString = n2m.toMarkdownString(mdblocks);
  return {
    metadata,
    markdown: mdString,
  };
}
記事一覧ページ
page / index.jsを編集します。
import { useState } from "react";
import Head from "next/head";
import { getAllPublished } from "lib/notion";
import { Image, List, Button } from "antd";
import { RedoOutlined, FieldTimeOutlined, LoadingOutlined } from '@ant-design/icons';
import useSWR from "swr";
import axios from "axios";
import Date from "components/convertdate";

const fetcher = async (url) => {
  if (!url) return null;
  const response = await axios.get(url);
  if (response.data.type === "external") {
    return response.data.url;
  } else if (response.data.type === "file") {
    return response.data.file.url;
  }
  return null;
};

export const getStaticProps = async () => {
  const data = await getAllPublished();

  return {
    props: {
      posts: data,
    },
    revalidate: 60,
  };
};

export default function Home({ posts }) {
  const [loading, setLoading] = useState(false);
  if (!posts) return <h1>No posts</h1>;
  const { data: imageUrl, error } = useSWR(posts?.thumbnail, fetcher);
  return (
    <div>
      <Head>
        <title>Notion API & Next.js</title>
        <meta name="description" content="Generated by create next app" />
        <link rel="icon" href="/favicon.ico" />
      </Head>
      <main>
        <div className="lg:container mx-auto px-2">
          <h1 className="mb-3">Notion API & Next.js</h1>
          <List
            itemLayout="vertical"
            size="large"
            loading={loading}
            pagination={{
              onChange: (page) => {
                console.log(page + "ページ目です");
              },
              pageSize: 3,
            }}
            dataSource={posts}
            renderItem={(post, index) => (
              <List.Item key={index}>
                <div className="flex gap-x-5">
                  <div className="w-[150px]">
                    <Image
                      preview={true}
                      width="100%"
                      height="100%"
                      alt={post.title}
                      src={post.thumbnail}
                      fallback="/noimg.jpg"
                      style={{ objectFit: "cover" }}
                      placeholder={
                        <LoadingOutlined spin />
                      }
                    />
                  </div>
                  <div className="flex-1">
                    <div className="space-y-[0.5rem]">
                      <h2 className="text-xl">
                        <p>{post.title}</p>
                      </h2>
                      <div>
                        <p className="flex items-center space-x-1"><FieldTimeOutlined /><Date convertDate={post.date}></Date></p>
                        <p className="flex items-center space-x-1"><RedoOutlined /><Date convertDate={post.last_edited_time}></Date></p>
                      </div>
                      {post.description && (
                        <p className="whitespace-break-spaces bg-white rounded w-fit p-3">{post.description}</p>
                      )}
                      <Button href={`/posts/${post.slug}`} className="inline-block">More</Button>
                    </div>
                  </div>
                </div>
              </List.Item>
            )}
          />
        </div>
      </main>
    </div>
  );
}
記事詳細ページ
pagesディレクトリにpostsフォルダを作成し、その中に[slug].jsというファイルを作成します。
notion-blog
└ pages
	 └ posts
		└ [slug].js
pages/[slug].js
import ReactMarkdown from "react-markdown";
import { Prism as SyntaxHighlighter } from "react-syntax-highlighter";
import { vscDarkPlus } from "react-syntax-highlighter/dist/cjs/styles/prism";
import { getAllPublished, getSingleBlogPostBySlug } from "/lib/notion";
import Date from "conpornents/convertdate";
import { Button, Image } from "antd";
import { RedoOutlined, FieldTimeOutlined, LoadingOutlined } from '@ant-design/icons';

const CodeBlock = ({ language, codestring }) => {
  return (
    <SyntaxHighlighter language={language} style={vscDarkPlus} PreTag="div">
      {codestring}
    </SyntaxHighlighter>
  );
};
const Post = ({ post }) => {
  return (
    <div className="news-detail px-3">
      <article className="space-y-10">
        <section className="px-10 pb-10">
          <h2 className="mb-2">{post.metadata.title}</h2>

          {post.metadata.thumbnail && (
            <div className="w-[200px]">
              <Image
                preview={true}
                width="100%"
                height="100%"
                alt={post.metadata.title}
                src={post.metadata.thumbnail}>
                fallback="/noimg.jpg"
                style={{ objectFit: "cover" }}
                placeholder={
                  <LoadingOutlined spin />
                }
              </Image>
            </div>
          )}

          <div className="space-y-3 mb-10">
            {post.metadata.tags?.length > 0 && (
              <p className="flex space-x-1">
                {post.metadata.tags.map((tag) => (
                  <span className="tag" key={tag}>
                    {tag}
                  </span>
                ))}
              </p>
            )}
            <div className="flex space-x-3 justify-end">
              <p className="flex items-center space-x-1"><FieldTimeOutlined /><Date convertDate={post.metadata.date}></Date></p>
              <p className="flex items-center space-x-1"><RedoOutlined /><Date convertDate={post.last_edited_time}></Date></p>
            </div>
          </div>

          <div className="owl">
            <ReactMarkdown
              components={{
                code({ node, inline, className, children, ...props }) {
                  const match = /language-(\w+)/.exec(className || "");
                  return !inline && match ? (
                    <CodeBlock
                      codestring={String(children).replace(/\n$/, "")}
                      language={match[1]}
                    />
                  ) : (
                    <code className={className} {...props}>
                      {children}
                    </code>
                  );
                },
              }}
            >
              {post.markdown}
            </ReactMarkdown>
          </div>
        </section>
        <div className="text-center">
          <Button href="/" size="large" className="inline-block">Back</Button>
        </div>
      </article>
    </div>
  );
};

export const getStaticProps = async ({ params }) => {
  const post = await getSingleBlogPostBySlug(params.slug);
  return {
    props: {
      post,
    },
    revalidate: 60,
  };
};

export const getStaticPaths = async () => {
  const posts = await getAllPublished();
  const paths = posts.map(({ slug }) => ({ params: { slug } }));
  return {
    paths,
    fallback: "blocking",
  };
};

export default Post;
ダミー画像の設置
サムネイル画像がない場合に表示する画像を作成します。
好きな画像を下記の場所に保存します。
ファイル名はnoimg.jpgにします。
notion-blog
└ public
  └noimg.jpg
スタイルシート
基本的にはAnt-desingとTailwind-CSSで記述しましたが一部SCSSも記述しています。 global.scssを下記に変更します。
@tailwind base;
@tailwind components;
@tailwind utilities;

body {
  padding: 80px 0;
  background: #ddd;
}

h1 {
  font-size: 30px;
  font-weight: bold;
}

h2 {
  font-size: 26px;
  font-weight: bold;
}

h3 {
  font-size: 21px;
  font-weight: bold;
  line-height: 1.5;
  letter-spacing: 0.1em;
}

ol,
ul {
  list-style: auto;
  padding: revert;
  padding-left: 1em;
}

.news-detail {
  max-width: 900px;
  margin-right: auto;
  margin-left: auto;

  .owl {
    > * + * {
      margin-top: 1.25rem;
    }
    pre {
      margin-top: 35px;
    }
  }

  h1,
  h2,
  h3 {
    margin-top: 2.5rem;
  }
  > hr {
    margin-top: 5px;
  }
  section {
    background: #fff;
    overflow: hidden;
    border-radius: 20px;
  }
  p {
    white-space: pre-wrap;
  }
  blockquote {
    border-radius: 3px;
    border: 1px solid rgba(135, 131, 120, 0.15);
    background-color: transparent;
    padding: 16px 16px 16px 12px;
    background: #fff;
  }

  p > code {
    font-family: "SFMono-Regular", Menlo, Consolas, "PT Mono", "Liberation Mono",
      Courier, monospace;
    line-height: normal;
    background: rgba(135, 131, 120, 0.15);
    color: #eb5757;
    border-radius: 3px;
    font-size: 85%;
    padding: 0.2em 0.4em;
  }
  .tag {
    background: rgba(135, 131, 120, 0.25);
    border-radius: 4px;
    color: inherit;
    padding: 0px 10px;
  }
}

.ant-image-placeholder {
  width: 100%;
  height: 100%;
  background: #fff;
  display: flex;
  flex-direction: column;
  justify-content: center;
  align-items: center;
  .anticon {
    font-size: 20px;
    color: blue;
  }
}

.anticon-left,
.anticon-right {
  vertical-align: middle;
}

// コードブロックのスタイル
$languageMap: (
  "abap": "ABAP",
  "agda": "Agda",
  "arduino": "Arduino",
  "assembly": "Assembly",
  "bash": "Bash",
  "basic": "BASIC",
  "bnf": "BNF",
  "c": "C",
  "clojure": "Clojure",
  "coffeescript": "CoffeeScript",
  "coq": "Coq",
  "css": "CSS",
  "dart": "Dart",
  "dhall": "Dhall",
  "diff": "Diff",
  "docker": "Docker",
  "ebnf": "EBNF",
  "elixir": "Elixir",
  "elm": "Elm",
  "erlang": "Erlang",
  "f": "F",
  "flow": "Flow",
  "fortran": "Fortran",
  "gherkin": "Gherkin",
  "glsl": "GLSL",
  "go": "Go",
  "graphql": "GraphQL",
  "groovy": "Groovy",
  "haskell": "Haskell",
  "html": "HTML",
  "idris": "Idris",
  "java": "Java",
  "javascript": "JavaScript",
  "json": "JSON",
  "julia": "Julia",
  "kotlin": "Kotlin",
  "latex": "LaTeX",
  "less": "Less",
  "lisp": "Lisp",
  "livescript": "LiveScript",
  "llvm": "LLVM IR",
  "lua": "Lua",
  "makefile": "Makefile",
  "markdown": "Markdown",
  "markup": "Markup",
  "matlab": "MATLAB",
  "mathematica": "Mathematica",
  "mermaid": "Mermaid",
  "nix": "Nix",
  "objective-c": "Objective-C",
  "ocaml": "OCaml",
  "pascal": "Pascal",
  "perl": "Perl",
  "php": "PHP",
  "text": "Plain Text",
  "powershell": "PowerShell",
  "prolog": "Prolog",
  "protobuf": "Protobuf",
  "purescript": "PureScript",
  "python": "Python",
  "r": "R",
  "racket": "Racket",
  "reason": "Reason",
  "ruby": "Ruby",
  "rust": "Rust",
  "sass": "Sass",
  "scala": "Scala",
  "scheme": "Scheme",
  "scss": "Scss",
  "shell": "Shell",
  "solidity": "Solidity",
  "sql": "SQL",
  "swift": "Swift",
  "toml": "TOML",
  "typescript": "TypeScript",
  "vb": "VB.Net",
  "verilog": "Verilog",
  "vhdl": "VHDL",
  "visual": "Visual Basic",
  "webassembly": "WebAssembly",
  "xml": "XML",
  "yaml": "YAML",
);
pre {
  position: relative;
  > div {
    border-radius: 10px 0 10px 10px;
  }

  code {
    &::before {
      content: "";
      padding: 5px 20px;
      position: absolute;
      top: 1px;
      right: 0;
      transform: translateY(-100%);
      background: inherit;
      background: #1e1e1e;
      border-radius: 5px 5px 0 0;
    }
  }

  @each $language, $name in $languageMap {
    code.language-#{$language}::before {
      content: "#{$name}";
    }
  }
}
最後に

今回は以上になります。
最後までありがとうございました。
参考書籍